The SEM Samurai Guide to SEO-Friendly Website Migrations
Website Migration Guide: How to Migrate a Website and Preserve SEO Value
As an SEO, is there anything more stressful than a large website migration? It might be exciting for the wider business; a new design, a new brand, improved performance, however, as the person managing the SEO side of the migration, you’re “sweating bricks” just hoping that you can pull off a miracle and maintain all that trust, equity and authority the site has built over the years (or decades).
The good news is that with a well planned website migration, the risks to organic visibility can be largely mitigated. Although it is important to highlight that it’s still not without some risk, even when all the boxes are checked.
We have worked on many website migrations over the last 20 years, and have also been tasked with fixing countless mistakes left behind by others who have executed a migration poorly. And, while every migration project is different, there’s one fact that never changes: We, as SEOs, do not have any control over the actual search engines, so we can never guarantee that a migration will be 100% successful. What we can guarantee is that, by following a detailed migration checklist, you minimise the risk profile for that migration and set yourself up for success.
In line with this, we are also very clear when managing expectations around organic traffic risks and post-launch forecasts with our clients. And while it depends on the type of migration we’re executing (more on this below) we will always flag the likelihood of a ~10% drop in organic visibility immediately after a large migration as search engines recrawl and reindex new pages, even when everything is completed according to plan.
We then highlight that a successfully managed migration should see a rebound to pre-migration levels pretty quickly (all things being relatively equal between old and new sites – more on this below!) and some site migrations will see an increase in organic traffic if other technical or structural improvements are made as part of the site migration (more on this below, too!).

The above chart was for a successful migration we managed in 2025. This was a sub-domain change AND split across two sub-domains (one existing, one new). Blue line = original sub-domain. Orange line = sessions from the two new sub-domains combined. It went very well!
How to Migrate Your Website and Preserve SEO Value
The following guide walks you through how we plan, execute, and monitor a website migration without tanking organic visibility for our clients. I hope you find it useful.
Part 1: Pre-Migration Planning, Data Gathering and Strategy
A successful site migration starts long before launch. In this first phase we define the migration type, audit the existing site, conduct a content audit, and gather data to prioritise URLs.
1.1: Understand Your Website Migration Type
We can break website migrations into two main scenarios:
- Site moves with URL changes, and
- Site moves without URL changes.
This guide largely deals with the scenario 1: Site moves with URL changes.
Site migrations that involve URL changes carry the most risk to organic rank and visibility because this scenario forces search engines to crawl and reindex the new URLs. A successful SEO website migration must focus on ensuring that, when the search engines crawl and index these new URLs, the signals from the old urls that determine organic value and authority are passed through to the new URLs.
Examples of website migrations with URL changes include:
- Switching platforms / CMS, e.g. from WordPress to Shopify,
- Redesigning the whole site structure, e.g. Information architecture and taxonomy updates.
- Domain Name changes: Rebranding and moving to a new domain,
- Merging or Consolidating websites: Combining multiple domains into one domain, or
- Splitting out one domain into multiple new sites,
- URL Path changes and Clean-up,
- HTTP to HTTPS migration (more on this below),
- General redesign (UX) where URL paths are impacted.
A Note on HTTP to HTTPS “migrations”.
We don’t consider moving from http to https a migration, e.g. it’s very low risk and generally handled by the web host or sys admins without any issues… however, it can still be poorly executed.
Check the headers and ensure that the HTTP -> HTTPS redirect is handled at the server via a permanent (301 or 308) redirect and NOT just via a HTTP Strict Transport Security (HSTS) instruction (Learn more about HSTS here). Permanent redirects help pass on link equity (SEO value), while only ‘redirecting’ the user via HSTS keeps the entire domain more secure but it does not send the signal to search engines that a URL has permanently moved and may impact SEO visibility in the HTTP > HTTPS switch.
Once you have determined your web site migration type, move on to the planning and strategy stage.
1.2: Full Crawl (Old site)
Start with a comprehensive crawl of the existing site using a tool like Screaming Frog or Lumar.io.
1.2.1: Gather a full inventory of URL assets on the current (old) site:
- Indexable URLs (status code 200)
- Image URLs
- PDF URLs
1.2.2: Gather a full inventory of meta data and content for the current (old) site:
- <tite>
- Meta Description
- h1(s) (hopefully there’s only one h1)
- Unique h2(s) > ignore generic non-unique h tags
- Unique h3(s) > ignore generic non-unique h tags
- Extract Additional Body Content (optional but a good idea for analysis options later!)
1.3: Create a URL Prioritisation List (Old site)
A comprehensive crawl tells you what exists, but it doesn’t tell you what matters. In this step, you must look beyond your current site structure to identify pages that hold external authority or historical value.
Creating a properly researched URL Prioritisation list is critical.
The High Level URL Prioritisation Process:
- Start by conducting a backlink analysis using tools like Ahrefs, Semrush, or Majestic to export every external link pointing to your domain; these URLs carry authority that must be protected with redirects, even if the pages are currently broken.
- Combine exported data from GA4 or your preferred analytics platform.
- Pull in data from Google Search Console.
- Combine everything into a single spreadsheet.
- Use vlookup or similar to pull in all the urls level metrics into the sheet (sessions, links, clicks, impressions)
- Start to filter and sort based on URLs that have value.
- Clearly mark all important URLs (these are the keepers).
- Flag URLS with zero / low sessions, and not external clicks, these can be dropped from the URL mapping process.
By combining current crawl data with backlink and historical data and Analytics and GSC data, you ensure that no equity is left behind.
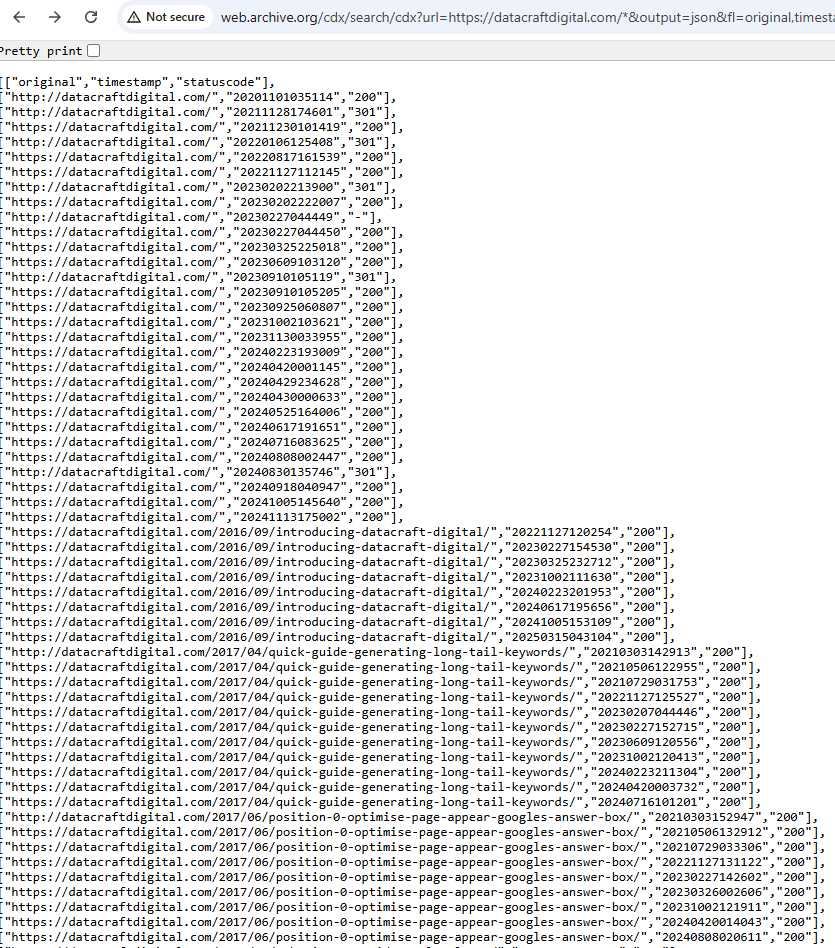
Pro Tip: Use the Wayback Machine API to uncover “legacy” URLs
Pro Tip: If you’re fixing a botched migration but no longer have access to the old site, you can use the Wayback Machine API to uncover “legacy” URLs from previous iterations of your site that may have been lost during past botched migrations. Mind blown! I did not know this until recently and was still crawling snapshots when needed, but thanks to David Gossage for sharing this gold, it’s so much easier.

Simply enter the following URL into your browser:
Steps:
- Replace the URL with your domain.
- Edit the to and from parameters in YYYYMMDD format to get a usable date range.
The result will give you every URL stored by Wayback Machine for that date range,
Amazing!
Example: http://web.archive.org/cdx/search/cdx?url=https://datacraftdigital.com/*&output=json&fl=original,timestamp,statuscode&from=20200501&to=20250531
Next Step:
- Using the output to build a list of URLs to scrape. Use Excel to convert the results into the following format:
https://web.archive.org/web/{timestamp}id_/{url}
1.4: Conduct a Full Content Audit (Old site)
You must understand exactly what is living on your old, legacy, site. This is critical for redirect mapping and Gap analysis with the new site. A content audit is not just a list of URLs; it is a strategic inventory used to identify high-value pages that must be protected at all costs.

To perform a thorough content audit, follow these steps:
1: Take the data already gathered during URL Prioritisation:
- Crawl and Catalog: Use a crawler like Screaming Frog or Lumar.io to generate a complete list of all crawlable URLs, including images and PDF documents.
- Layer in the Data: A URL alone doesn’t tell the full story. You must export and merge data from several sources to see which pages are actually driving organic visits, revenue, and link equity. eg.
- Google Analytics 4,
- Search Console, and
- backlink tools like Ahrefs or Majestic,
2: Then:
- Identify “Strategic Pages”: Not all high-traffic pages are equal. Prioritise strategic pages, those that support key business initiatives or generate the most profit, for closer validation during the migration process.
- The “Keep, Consolidate, or Delete” Decision:Based on your data, categorise every URL. If a page provides no value, you can safely let it 404, although we recommend serving a 410 (Gone) status code to speed up the de-indexing.
- Never redirect to an irrelevant destination like the homepage. If the intent of the page changes Google will treat it as a soft 404 anyway.
1.5: Set your performance benchmarks.
In conjunction with your client, or the wider business if you’re in-house, document current performance benchmarks and visibility indicators. This defines the baseline fo rpost-migration success. Circulate this to all stakeholders.
Performance Benchmarks should include (minimum):
- Current organic traffic levels (sessions, engagement)
- Keyword rankings and Share of Voice benchmarks
- Top landing pages by channel.
- Conversion rates by channel.
- Conversion volume by channel.
1.6: Conduct a Risk Assessment.
Now that you have your data, it’s time to play “devil’s advocate.” You need to look at your migration plan and ask yourself where you think you might lose traffic. A risk assessment isn’t about being pessimistic; it’s about identifying the specific areas of your site where changes could trigger a drop in visibility or revenue.
- Analyze Content Gaps (The “Pruning” Risk): If your new site architecture involves removing specific sections, archiving old products, or deleting outdated blog posts, you must quantify exactly what you are losing. Don’t just guess. If you decide to prune a category of products because you or your client have identified that they’re not sold any more, you still need to confirm if those pages are currently driving traffic that funnels users elsewhere on the site. Removing content means removing the keywords those pages rank for. If you don’t have an equivalent page on the new site to redirect to, that equity evaporates.
- Identify “High-Stakes” Site Sections: Review your Strategic Pages list against your proposed new site structure. Which sections are driving the bulk of your organic traffic, engagement, and revenue?.
- High Risk: If your top revenue-generating section is undergoing a complete URL restructure and a design overhaul simultaneously, that is a “High Risk” zone.
- Medium Risk: A section changing URLs but keeping the same content and internal link structure.
- Low Risk:Pages that are remaining largely untouched on the same URL path. By mapping risk levels to site sections, you know exactly where to focus your testing efforts during the staging phase.
1.7: Forecast Traffic Levels based on known risks
Clients and Business stakeholders hate surprises so it’s vital to manage expectations regarding organic traffic risks before launch day, rather than making excuses after. You should create a forecast that accounts for both expected volatility and intentional data loss.
- The Volatility Tax:We always flag the likelihood of a ~10% temporary drop in organic visibility immediately following a large migration. This is the volatility tax as search engines recrawl and reindex your new URLs. Even when executed perfectly, it takes time for signals to settle. Be clear that this is a temporary dip, assuming technical SEO is sound.
- Calculating Intentional Loss: If your risk assessment (Step 1.6) identified sections that are not being migrated, you must deduct their traffic from your forecast.
- The Math:Take your current baseline traffic (e.g., 100k sessions/month). Subtract the traffic from the pages you are pruning (e.g., 5k sessions/month). Then, apply the volatility buffer.
- The Narrative:This allows you to say, “We expect a baseline traffic of 85k-90k in Month 1 due to the removal of the legacy blog and expected re-indexing volatility.”
By presenting a data-backed forecast, you protect yourself from panic when the numbers naturally fluctuate, and you prove that the migration strategy is intentional, not accidental.
Part 2: The Migration Execution
2.1: Create a Technical SEO Specification Document
The scope of this document depends largely on how familiar your front-end developers are with Technical SEO. At a minimum we recommend covering the following:
- URL structure rules (keep it logical and consistent)
- Meta data requirements (titles, descriptions, OG tags)
- Structured data setup (JSON-LD, schema markup)
- Canonical tag conventions
- Redirect logic (we’ll talk more about this next)
- JavaScript frameworks, rendering and search crawler accessibility.
Circulate this with your developers(s) and schedule a follow up meeting. Run through each point and explain the ‘why’ for each. Answer questions and ask questions. And remember, the Dev team is a Technical SEO’s best friend, help educate them on SEO and, in turn, learn from them too.
2.2: Setting Up a Staging/Test Environment
If you’re an SEO, consulting to a business, just confirm that the developers have a staging site set up and make sure you’re able to get access to it.
If you are THE web developer on the project, please don’t skip this step!
You always need a full staging site where you can test everything safely.
Critical SEO Step:Block the staging site from search engines using password protection and/or meta noindex. robots.txt alone isn’t enough.
You will run multiple full technical crawl of the staging version before launch. Look for broken links, redirect chains, and canonical issues. You want to address as many minor technical issues as possible before the site is pushed to prod. Otherwise you run the risk of polluting the index immediately with pages you never meant to have in the search index.
2.3: Conduct a Content Gap Analysis (New site)
A website migration is a great opportunity to address legacy issues and reorganise your content for future growth. A content gap analysis ensures that the new site structure isn’t just a copy of the old one, but an optimised version that meets current search demand.
- Mapping Search Demand:Review your keyword research to identify new landing page opportunities. If there is significant search volume for topics you aren’t currently covering, the migration is the perfect time to build these into your new site architecture.
- Protecting Topical Relevance:Be cautious about “content pruning.” While it’s tempting to remove old content, some of that content may be contributing to your site’s overall topical relevance. Removing it could inadvertently cause your primary pages to lose their authority in the eyes of search engines.
- Reviewing Taxonomy and Navigation: Ensure your new taxonomy allows users and search engines to reach any page in as few clicks as possible. During the wireframe review stage, double-check that high-traffic pages haven’t been accidentally buried or removed from the primary navigation.
- Avoiding Cannibalisation: If you find multiple pages competing for the same keywords, use the migration to merge and consolidate them into a single, stronger asset.
2.4: Update Risk Assessments and Forecast based on known Content Gaps (New site)
Now that you have completed the Content Gap Analysis of the new site build, you likely discovered that the reality doesn’t quite match the initial plan. This is the moment for a “sanity check.” Your initial forecast (from step 1.7) was based on the intention of the migration; this update is based on the actual build.
- Quantify the “Missing” Traffic:If your gap analysis reveals that specific high-traffic sections or “outdated” blog posts have been cut to achieve a cleaner design, you must calculate the cumulative traffic of these missing pieces. If you found that 15% of your currently ranking keywords no longer have a relevant landing page on the new site, you cannot simply hope for the best. You must deduct this traffic from your baseline forecast immediately.
- The “Topical Authority” Risk:The risk isn’t just about the direct traffic lost from deleted pages. As we noted in the gap analysis, removing supporting content (often dismissed as old or unnecessary) can damage your site’s overall topical relevance. If you prune too aggressively without consolidating that value elsewhere, you risk destabilizing the rankings of your primary “money pages” because search engines no longer view you as an authority on the broader topic.
- The Revised Forecast: If the gap analysis shows significant missing SEO elements, like category pages stripped of text or a reduced internal linking structure, you need to adjust your volatility forecast upwards. That standard “~10% temporary drop” might look more like a 20-30% drop if the new site is less content-rich than the old one.
- Stakeholder Alert: This is your “speak now or forever hold your peace” moment. You must present this updated risk profile to stakeholders before launch. By quantifying the potential revenue loss caused by these content gaps, you give the business a choice: delay the launch to fill the gaps, or proceed while accepting a steeper traffic decline as the cost of the new design.
2.5: Mapping and Redirects (The Most Critical Step)
This is the heartbeat of all website migrations!
Create a 1-to-1 URL map from your old site to your new one. Every single live page on the old site needs to point to its new home using a 301 redirect – that’s what passes SEO equity.
Bulk 301-redirect Mapping
If you want to do this manually, go for it. But the smarter way is to use a bulk 301-redirect mapping tool to do the heavy lifting.
Obviously we’re biased, but SEM Samurai is your friend here! AI-powered 301 redirect mapping at scale!
Map 1000’s of URLs in minutes.
Also, if you’ve only got a small site ~ 100 urls, SEM Samurai will map them in seconds! 100 Urls can still take quite a bit of time when done manually…
..and, let’s not forget, you can map up to 100 URLs for free!
Pro-tip: Never redirect everything to the new homepage(it’s tempting, but terrible for SEO).
Your redirect map should live in a simple spreadsheet, somthing like this:
| Old URL | New URL | Redirect Type |
| /about-us | /about | 301 |
| /blog/seo-basics | /resources/seo-basics | 301 |
After implementing, test the redirects with Screaming Frog or your crawler of choice. Watch out for:
- Redirect chains (A → B → C)
- Redirect loops (A → B → A)
- Broken redirects
- Incorrect status, 302/307 instead of 301/308
Images and assets
Don’t make the mistake of only mapping your HTML pages; images, PDFs, and other assets are often the “forgotten victims” of site migrations, yet they frequently hold significant SEO value.
These files often accumulate their own backlinks and drive steady traffic from image search, all of which evaporates if you break the URL connection. Furthermore, because Google crawls image files much less frequently than standard web pages, implementing 301 redirects is essential to help search engines discover and index your new media locations quickly. If mapping every single asset feels technically impossible, you should at the very least identify and redirect the specific image and PDF URLs that have accrued external backlinks to ensure you don’t sever those lines of authority.
2.6: SEO-Specific Technical Checklist
Before you go live, run through this list:
- Internal Linking:Update all internal links to point to new URLs.
- Canonical Tags:Make sure each page references its correct new URL.
- XML Sitemap: Generate a new sitemap and submit it to Google Search Console.
- Robots.txt:Allow crawling of the new site; block any temporary environments.
- Page Speed & Core Web Vitals: Test with PageSpeed Insights or Lighthouse. Make sure the new build isn’t slower than before.
Part 3: Testing, Launching, and Monitoring
Once you hit “go live,” things get real pretty fast!
3.1: Pre-Launch QA and Soft Launch
You wouldn’t run a marathon in brand new shoes without walking in them first, right? The same logic applies to your migration. Before you flip the switch and update your DNS records, you need to treat your staging environment as if it were live. This is your “dress rehearsal,” and it requires a full Quality Assurance (QA) process.
- The random “Click-Around” is not enough:Don’t just click around the homepage. You need to verify every critical element. Test your contact forms, ensure the checkout process works seamlessly, and validate that every item in your navigation menu points to a live 200 OK page rather than a broken link.
- Redirect Validations: This is the most common point of failure. Test your redirects in the staging environment to ensure they don’t create loops (A goes to B, B goes to A) or chains (A goes to B, B goes to C). A tool like Screaming Frog is invaluable here for bulk testing your mapping.
- Technical Spot Checks: Ensure that the analytics tracking codes are firing correctly and that your robots.txt file on the new site is prepared to allow crawling (removing any “Disallow: /” rules you used during development).
For large sites:Some SEOs recommend the “Soft Launch” Strategy. In this scenario, If you are managing a massive enterprise site, migrating everything at once can be risky. Instead, tou could consider a soft launch or phased rollout.
- Test the Waters: Push the migration live for a smaller, distinct section of the site first, such as a specific sub-folder or subdomain.
- Contain the damage if something goes wrong:This strategy allows you to spot unexpected technical issues in a controlled environment. If something breaks, it only affects 5% of your traffic rather than tanking your entire organic visibility overnight. Once you have confirmed stability in this pilot section, you can confidently roll out the rest of the site.
Our view on this: Should you do a staged migration for a large, enterprise, site? This sits squarly in the “It depends” bucket! Attempting a staged migration may reduct risk but it can also introduce other issues and challenges such as complex internal linking considerations during the rollout, sitemap and indexing complecity, multiple internal redirect updates, and more.
3.2: Immediate Post-Launch Checks (The First 48 Hours)
The first two days after launch are the “danger zone.” Your site is live, but Google hasn’t fully formed its opinion on the new structure yet. This is your window of opportunity to catch critical errors before they turn into long-term ranking drops.
Here is your immediate battle plan:
- Spot-Check Priority Redirects:You likely have thousands of redirects, but you need to manually verify the ones that pay the bills. Take your top 50–100 “Strategic Pages” (the ones you identified in step 1.3) and test them manually. Don’t just check that they redirect; check that they return a 301 (or 308) status code (not a 302 or 307) and land exactly where they are supposed to, without hopping through a “daisy chain” of multiple redirects.
- Claim Your GSC & Bing:Don’t wait for search engines to find you. Go to Google Search Console and Bing Webmaster Tools immediately.
- Verification:Ensure your ownership verification is still valid on the new site.
- Sitemaps: Submit your new XML sitemap so Google knows what to index. Crucially, experienced SEOs also recommend submitting the old XML sitemap (containing the legacy URLs) temporarily. This forces Google to crawl the old URLs, hit the redirects, and update their index faster.
- Change of Address: If you changed domains, use the Change of Address tool in GSC to explicitly tell Google about the move.
- Monitor Real-Time Traffic: Open the Real-Time report in GA4. You should see immediate activity. If you see a flatline (zero active users), you likely have a broken tracking code or a configuration error.
- Pro Tip: Add an annotation in your analytics platform to mark the exact date and time of the launch. This simple step saves massive headaches during future reporting.
- Validate Conversions and Tracking: Traffic is vanity; revenue is sanity. Perform User Acceptance Testing (UAT) by acting like a customer. Fill out a contact form, sign up for the newsletter, and place a test order. Verify that these events are firing correctly in your analytics debug view. If the site looks pretty but the checkout button is broken, SEO is the least of your worries.
- The “Robots” Safety Check: One of the most common migration disasters is leaving the “staging” directives on the live site. Double-check your robots.txt file to ensure it isn’t blocking search engines (look for Disallow: /) and scan your source code to ensure the noindex tags used during development have been removed.
If something is off, fix it fast. You want Google’s first crawl of your new site to be flawless, not a record of broken links and server errors.
3.3: Ongoing Monitoring and Recovery
Your job as an SEO doesn’t end on launch day, that’s just when the next chapter begins.
In fact, the weeks following a migration are often more critical than the launch itself because this is when the data starts telling the real story.
- The Critical Data Checks (Daily/Weekly Tracking): You need to become obsessed with your data. Keep a close watch on your rankings, organic traffic, and conversions on a weekly basis. In Google Search Console, monitor the Index Coverage report closely. You are looking for a specific crossover trend: the number of indexed pages from your old site should steadily drop, while the number of indexed pages from your new site should rise at a similar rate. If the old URLs aren’t dropping, Google might not be respecting your redirects yet.
- Log File Analysis (The Deep Dive):Don’t just guess what Google is doing, watch them. Use log file analysis to see exactly how Googlebot is interacting with your new architecture. Are they spending too much crawl budget on 301 redirects? Are they hitting unexpected 404s or 500 errors on the new site? This data is the only way to confirm that search engines are actually digesting the new site structure efficiently.
- Link Reclamation (The Clean-Up):Once the dust settles and rankings stabilise (typically after 1-3 months), it’s time to go the extra mile. Identify your top link partners, the high-authority sites that are linking to you, and ask them to update their backlink to the new URL directly. While 301 redirects do pass authority, a direct link is always cleaner and safer. This small administrative effort can reclaim a surprising amount of link equity and give your new site an extra push..
Essential Tools for a Smooth Migration
Tools won’t save you from poor planning, but the right ones make everything easier.
Manual tools (like spreadsheets and direct server testing) give you control, but automated tools can scale your checks across thousands of URLs.
Here’s a solid toolkit:
- Crawlers: Screaming Frog, Lumar.io, Sitebulb
- Bulk 301-redirect mapping: SEM Samurai, of course!
- Backlink analysis: Ahrefs, Semrush, Majestic
- Performance monitoring: Google PageSpeed Insights, GTmetrix
- Log analysis:Screaming Frog Log File Analyser, JetOctopus
- Rank tracking:AccuRanker, getSTAT
- Google Search Console
- Bing Webmaster Tools
Common Pitfalls and Lessons Learned
Almost every migration mistake comes from rushing or skipping steps.
Here are some big ones to avoid:
- Launching without a redirect map, or redirecting everything to the new home page.
- Forgetting to block staging from Google, or
- Forgetting to unblock the prod site from Google post launch!
- SEO not working closely enough with the developers. SEOs, the dev team is your best friend!
- Not auditing the old site first (it happens!).
- Not monitoring closely enough post launch and missing performance drops. The sooner you can act and rectify issues the better.
- Relying on just a sitemap.xml or a crawl data for URLs to migrate.
- Not 301 redirecting all important pages from the old site, or
- 301 redirecting everything to the new home page, or
- 302 (temporary redirection by mistake).
There are so many things that can go wrong, and they will go wrong if you don’t show the necessary attention to detail. The SEOs that succeed plan meticulously, test relentlessly, and communicate constantly.
We’ve seen brands bounce back after disastrous migrations, and helped many recover when things were done badly in the first place, but it takes time.
SEO Friendly Website Migration Checklist

To help you out we’ve put together a Website Migration Checklist (Google Sheets). Make a copy, share with your team, we hope it helps!
Final thoughts
Migrations don’t have to be nightmares. When you plan carefully, document everything, and monitor closely, you can relaunch your site without sacrificing the SEO you’ve worked hard to build.
Take your time. Get your team aligned. And remember – SEO for site migrations isn’t just about keeping rankings; it’s about coming out the other side stronger.
Resources and Further Reading:
- https://developers.google.com/search/docs/crawling-indexing/301-redirects
- https://developers.google.com/search/docs/crawling-indexing/site-move-no-url-changes
- https://developers.google.com/search/docs/crawling-indexing/site-move-with-url-changes
- https://www.aleydasolis.com/en/search-engine-optimization/seo-for-web-migrations
- https://www.screamingfrog.co.uk/seo-spider/tutorials/how-to-use-the-seo-spider-in-a-site-migration
- https://moz.com/blog/website-migration-guide
- https://seeker.digital/blog/seo-guide-website-migrations
- https://www.conductor.com/academy/website-migrations
- https://www.semrush.com/blog/website-migration-checklist
- https://www.botify.com/blog/12-tips-for-site-migrations-top-insights-from-industry-experts
- https://www.botify.com/blog/website-migration-checklist-seo
- https://www.lumar.io/blog/best-practice/website-migration-checklist-for-seo-key-tasks-to-maintain-organic-search-success/